
VEIN is a highly open-ended survival game with a strong focus on detail and realism.
Because of this, new players often struggle to understand why they fail or what they did wrong.
This guide is written for beginners who are just starting VEIN
or players who feel lost in the early stages of the game.
It covers essential settings and basic survival knowledge needed to get through the opening hours.
Read through this guide first to build a stable foundation for early-game survival.
- Demo Version vs Early Access Version
- Difficulty Settings: Beginners Should Start on Standard or Hard
- Recommended Starting Skills and Professions
- Recommended Professions
- Recommended Starting Location
- Controls and Keybindings
- Cell Phone and Map: Avoid Getting Lost
- Inventory Management: Fast Item Transfers
- Secure a Vehicle Early
- Recommended Early Weapons
- Increase Carry Weight
- Recommended Tool & Equipment Loadout: What to Carry
- Water and Food: Building a Stable Supply
- How to Survive the Night Safely
- Choosing Your First Base: Prioritize Space and Convenience Over Defense
- What to Do When You’re Injured or Sick: Press [I] First
- Death and Respawn Mechanics
- Updating Your Respawn Point
- Item Drops and Recovery
- Essential Survival Tips You Should Know
Demo Version vs Early Access Version
If you have not purchased VEIN yet and want to know what kind of game it is, playing the Demo version is strongly recommended.
Although some features are restricted, the demo allows you to fully experience the core gameplay systems and overall atmosphere of VEIN.
Below are the main differences between the Demo version and the Early Access version.
Save Data Transfer
There is no official save transfer feature.
However, by manually moving the save data files, character data can be carried over to the Early Access version.
World data cannot be transferred and will be reset.
Playable Areas
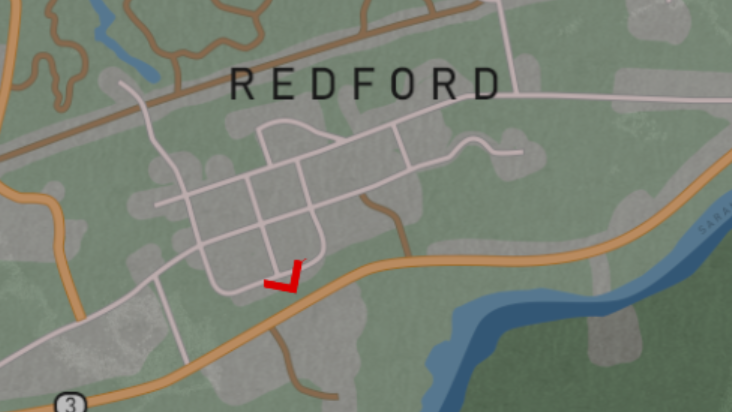
In the Demo version, exploration is limited to the following areas:
- Saranac
- Redford
You cannot access Lyon Mountain or Dannemora.
Only the red-highlighted areas shown in the image below are available in the demo.

Skill Level Cap
In the Demo version, the maximum skill level is 50.
In the Early Access version, skills can be leveled up to 100.
Due to this limitation, some advanced crafting recipes and facilities cannot be used, as their level requirements cannot be met in the demo.
Difficulty Settings: Beginners Should Start on Standard or Hard
When starting a new game, you must choose one of six difficulty presets.
Even if you are experienced with survival games, higher difficulties are not recommended for your first playthrough of VEIN.
For beginners, starting on Standard or Hard is strongly recommended.
There are three main reasons for this recommendation.
- Timing of infrastructure shutdown (grace period)
- Item respawn settings
- Zombie strength and detection range
The details are explained below.
In the current version, there is a known bug where difficulty presets may not apply correctly.
Before starting the game, open the Advanced Settings at the bottom of the screen and confirm that all values are correctly applied, or manually adjust them if necessary.
Infrastructure Shutdown Timing
This is one of the harshest mechanics for new players.
On Very Hard and above, electricity and water are disabled from the very beginning, forcing players to search for drinking water immediately.
On Standard difficulty, there is a grace period of approximately 1.5 in-game months.
Use this time to learn the basic survival loop, such as building rainwater collectors, securing a generator, and preparing for life after infrastructure shutdown.
Item Respawn and Zombie Scaling
On Very Hard and above, item respawn is disabled.
Survival depends entirely on a limited amount of world resources, fundamentally changing how the game is played.
In addition, zombie spawn counts are doubled, and their detection abilities (vision and hearing) are increased by 1.5x, significantly raising the risk during exploration.
For your first playthrough, it is safest to learn the map and core mechanics on Standard.
Even players seeking a more intense survival experience should limit their first run to Hard.
Special Difficulty Options
The Advanced Settings menu includes special options that cannot be changed through standard difficulty presets.
One example is Permadeath mode, where the character is permanently deleted upon death.
Other parameters can also be customized beyond preset limits.
If you are interested in fine-tuning your experience, it is worth reviewing these settings in detail.
Recommended Starting Skills and Professions
During character creation, you can distribute a total of +25 bonus levels across three different skills.
In most cases, any choice can be corrected later, so personal preference is fine.
However, if you care about efficiency, the best approach is to invest in useful but slow-leveling skills.
(Note: You cannot allocate all bonus points into a single skill.)
Important Warning: Do Not Start with a Skill at Level 50
Before listing recommendations, there is an important skill mechanic that beginners often miss.
In VEIN, every skill has a perk called Bank It.
This perk becomes permanently unavailable the moment that skill reaches level 50.
Because of this, the perk points gained at level 25 must be invested into Bank It before reaching level 50.
If you fail to do so, the perk can never be obtained for that skill.
While Bank It only becomes active when a skill reaches level 100,
it is still a very powerful perk, as it allows you to unlock five perks instead of the normal four.
Depending on your initial skill allocation and profession choice,
a skill may start at level 50, making Bank It permanently unobtainable.
This is a common and irreversible mistake, so be careful when assigning starting bonuses.
Top 3 Recommended Starting Skills
Scavenging
Reason: Provides strong perks such as faster looting and increased chances of finding rare items.
Despite its usefulness, this skill levels up extremely slowly, making it an ideal candidate for starting bonuses.
Sneaking
Reason: Sneaking perks reduce the chance of being detected by zombies, allowing you to avoid unnecessary combat.
This greatly improves safety during exploration, and the skill is also very slow to level naturally.
Lockpicking
Reason: Some locked containers require a minimum Lockpicking level to attempt.
Raising the starting level allows access to rare loot early on.
With around level 25, most locks can be attempted, though some containers require level 75.
Since Lockpicking levels slowly, investing early is strongly recommended.
Skills You Do NOT Need to Invest In
Strength
Benefits such as increased carry weight are useful, but the skill levels quickly through melee attacks or logging.
Crafting-related skills
(Construction / Crafting / Mechanical / Electrical)
These skills are required for certain facilities, but they naturally increase simply by crafting items and using equipment.

Recommended Professions
At the final step of character creation, you must choose a profession,
which affects both starting skill bonuses and initial equipment.
Starting equipment is generally not very important.
The real value lies in the starting skill level bonuses.
Two professions stand out as particularly strong choices.
Conspiracy Theorist
Bonus: Scavenging +25
Explanation:
This profession provides a large boost to Scavenging, a highly useful but slow-leveling skill.
When combined with starting skill allocation, it is possible to begin at level 50.
However, doing so will prevent you from obtaining the powerful Bank It perk, so caution is required.
Thief
Bonus: Lockpicking +15 / Sneaking +10
Explanation:
The Thief starts with the lockpick blueprint, allowing lockpicks to be crafted immediately.
This removes reliance on RNG for blueprint drops and makes early-game item collection much more stable.
Recommended Starting Location
After choosing a profession, you will be asked to select a starting location.
In most cases, any location works, since you can freely travel by vehicle later on.
That said, loot availability and overall difficulty differ slightly between areas.
Below is a brief overview of each starting location.
- Saranac
Balanced starting area with a school, fire station, and archery shop.
Many residential houses and a moderate amount of loot.
A safe and reliable choice for beginners. - Dannemora
Features a prison with access to a large number of firearms.
Also has a gun shop, making early weapon acquisition easy.
A good choice if you want faster early progression. - Lyon Mountain
Few buildings, with caves and industrial facilities instead.
Very limited early-game loot.
Not recommended as a starting location for beginners. - Redford
Quiet residential area with a relaxed atmosphere.
Has a fire station, but no particularly strong looting spots.
Suitable for a slower, more casual playstyle.
If you want to progress quickly, starting in Dannemora and securing firearms early is recommended.
After your base is established and you need large amounts of metal,
you can then move on to caves or military facilities.
In the early game, however, there is little benefit to exploring caves.
Focusing on looting the area around your base is usually more than enough.
Controls and Keybindings
Basic movement using WASD is omitted here.
Other essential controls are listed below.
I: Open Inventory
(Also used for skill management and basic crafting)
B: Open Building Menu
M: Open Map (requires Map or Cell Phone equipped)
F: Toggle Flashlight On / Off
Number Keys (1–9): Equip items assigned to each slot
Shift (Hold): Sprint
Space: Jump / Climb
Ctrl (Hold): Crouch
(Note: You can switch between hold and toggle in the settings.)
R: Reload
Q: Push (Shove enemies back)
More detailed controls can be checked via
ESC → Settings → Keybindings.
If the default layout feels uncomfortable,
it is highly recommended to customize the keybindings to suit your playstyle.
Cell Phone and Map: Avoid Getting Lost
At the start of the game, most professions begin with a Cell Phone already equipped.
This item is actually a highly versatile survival tool with several essential functions.
The most important features are the map display and current position tracking.
With the Cell Phone equipped, you can open the map by pressing M.
Make sure the phone is powered on and has sufficient battery remaining.
It is easy to unequip the phone accidentally while managing inventory,
or to leave it behind at your base.
For this reason, it is strongly recommended to lock the item using the lock icon as soon as you obtain it.
What the Cell Phone Does
Simply having the Cell Phone equipped enables all of the following features:
- Map Display (M key): Opens the map screen
- Flashlight (F key): Provides light in dark areas
(Note: The light is weak and not suitable for cave exploration) - GPS Function: Displays your current position on the map
- Compass & Clock (Always On): Shows direction and current in-game time on the HUD
Because all of these functions are combined into a single item,
exploration is significantly more difficult without it.
The world of VEIN is vast, and wandering aimlessly can easily result in getting permanently lost.
Always keep the Cell Phone equipped and check the map regularly while exploring.
An original, lightweight map designed for easy viewing on smartphones. Includes many pins highlighting recommended exploration locations.

A detailed explanation of the map’s useful features and how to use them. See this page for tips on navigation and map functions.
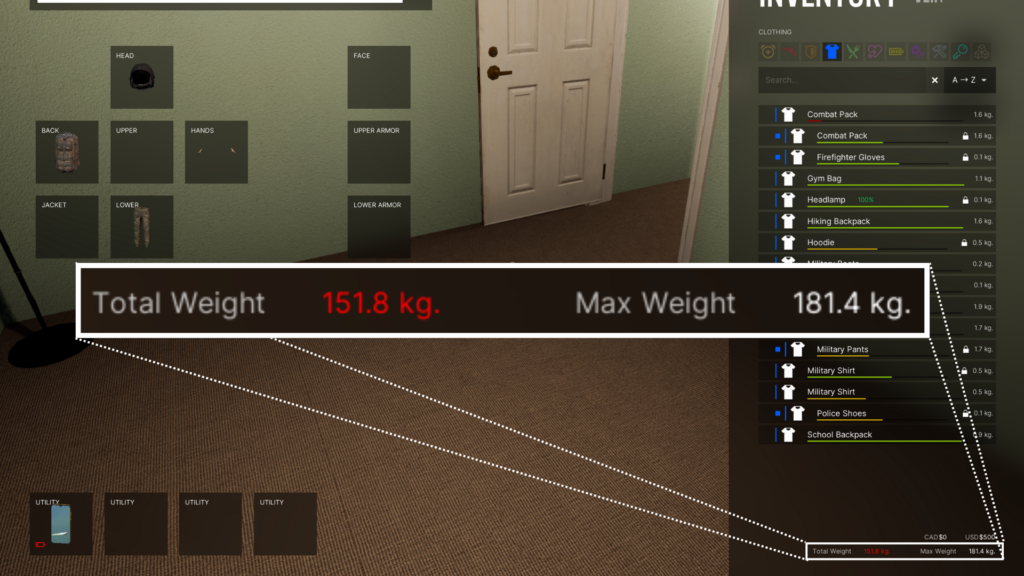
Inventory Management: Fast Item Transfers
After returning from exploration, managing items manually with mouse dragging is inefficient.
Use the following shortcuts and features to unload your loot quickly.
Basic Transfer Controls
- Shift + Click
Instantly moves an item to the opposite window
(Inventory ⇔ Container) - H Key – Take All
Transfers all items from the container to your inventory
(If a category tab is selected, only items in that category are affected) - J Key – Store All
Transfers all items from your inventory into the container
⚠️ Be careful: without using item lock, this will also store equipped items.
Smart Storage: “Store Similar Items”
The “Store Similar Items” button at the bottom of the inventory screen is extremely useful.
When clicked, it transfers only items that already exist in the container, making automatic sorting easy.
Example use:
If you have dedicated containers such as Food Box or Material Box, simply open each container and press this button to sort items instantly.
Instant Dismantling with Alt Key
By enabling Quick Dismantle in the settings,
you can dismantle items instantly with Alt + Click.
This is very convenient, but be careful to avoid accidental dismantling.
Preventing Mistakes: Item Lock System
In the inventory screen (I key), each item has a Star icon and a Lock icon.
The Lock icon is especially important.
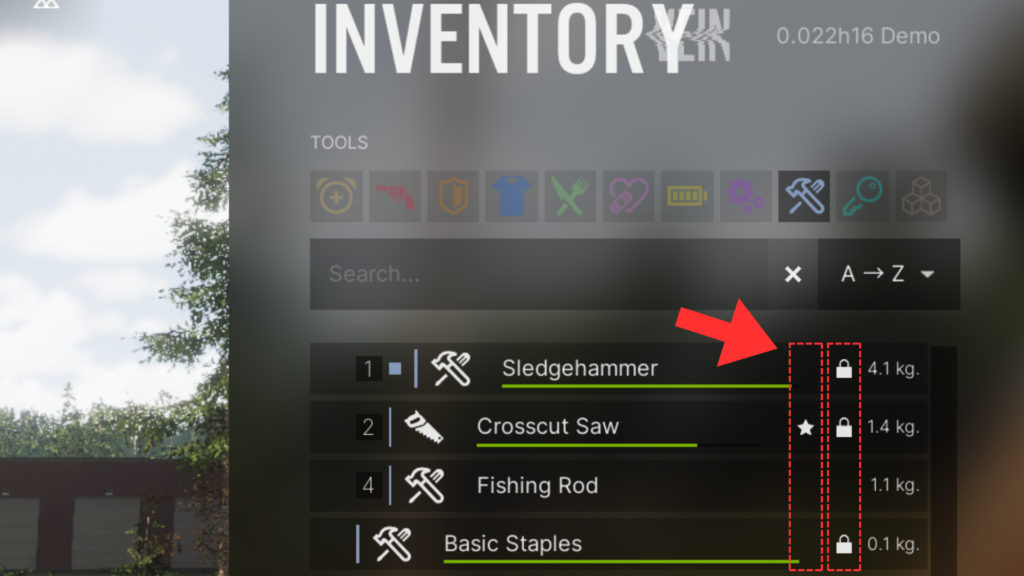
When an item is locked:
- It will not be transferred by bulk actions such as J (Store All)
- It remains in your inventory even during mass unloading
Always lock essential items such as:
- Cell Phone
- Main Weapon
- Shoes
⭐ Items marked with the Star icon are displayed at the top of the list.
Use it for frequently used items.
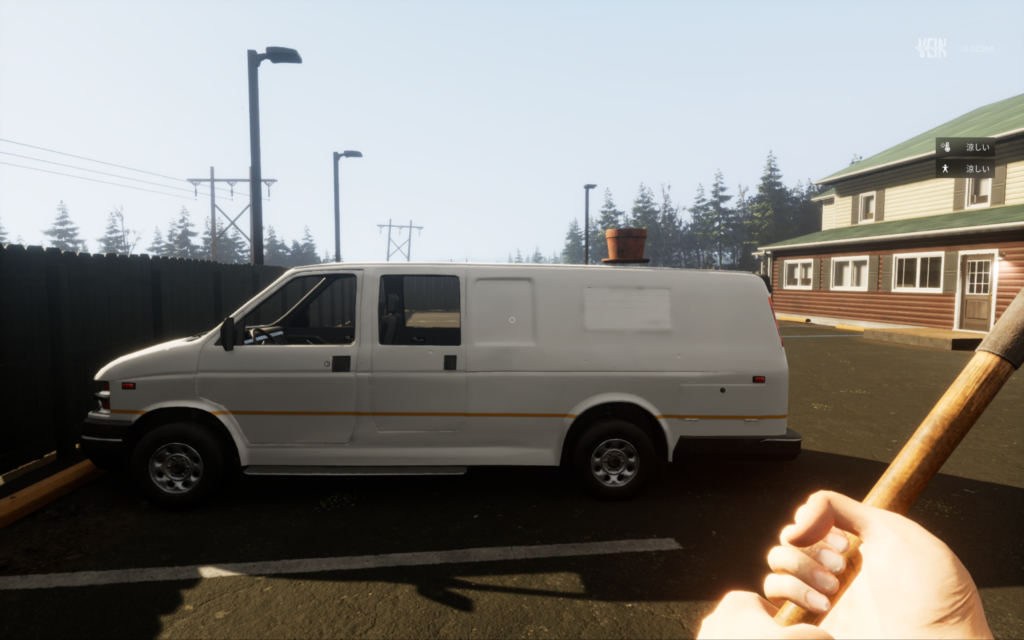
Secure a Vehicle Early
Exploring on foot is dangerous and inefficient.
Securing a vehicle early dramatically improves safety and efficiency.
Benefits of Vehicles
- Safety
Zombies can be run over.
Even if surrounded, you can fight while seated inside the vehicle. - Cargo Capacity
Large amounts of loot can be stored in the trunk.
Trucks can carry over 1 ton. - Travel Speed
The world is vast—vehicles are essential for efficient exploration.
How to Start a Vehicle
- Unlock the Door
Use lockpicks if the door is locked. - Start the Engine
Sit in the driver’s seat.
If no key is present, use Hotwiring.
⚠️ Some vehicles have security alarms.
Even if the alarm triggers, enter the vehicle and start driving—while moving, you are nearly invulnerable.
Recommended Early Weapons
In VEIN, taking damage equals infection risk.
High-damage melee weapons with strong knockback are essential.
Top Early-Game Choices
Wood Axe (Highly Recommended)
- Base Damage: 30
- DPS: 30
- Swing Speed: 1.0s
High damage and knockback make hit-and-run tactics very safe.
Also useful as a tool.
Baseball Bat (Acceptable Alternative)
- Base Damage: 15 → 23 (Upgraded)
- DPS: 18 → 25
- Swing Speed: 0.9s
Can be upgraded into a Nail Bat at a workbench.
Sledgehammer (High Risk / High Power)
- Base Damage: 34
- DPS: 23
- Swing Speed: 1.5s
Extremely powerful single hits.
Slower, but excellent for one-on-one encounters.
💡 Tip: Melee headshots exist.
Aim high to increase damage and reduce infection risk.
Increase Carry Weight
Carry weight directly affects exploration efficiency.
1. Backpacks
There are four types:
- School Backpack
- Gym Bag
- Hiking Backpack
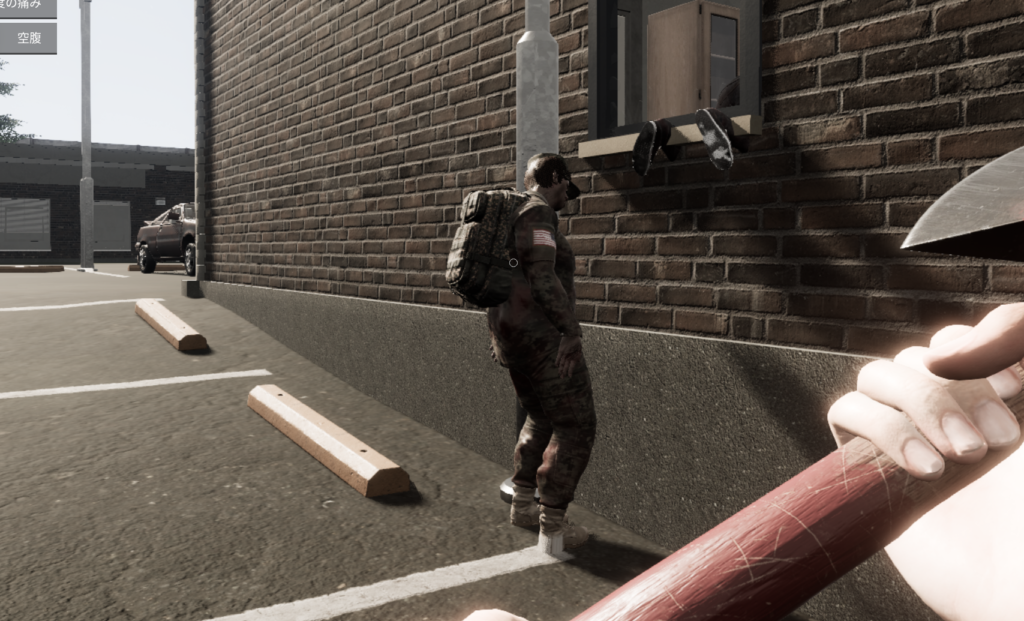
- Combat Pack (Best overall)
Combat Pack offers both high capacity and defense.
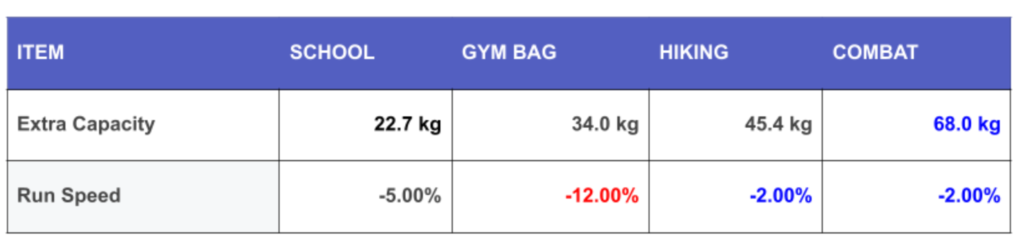
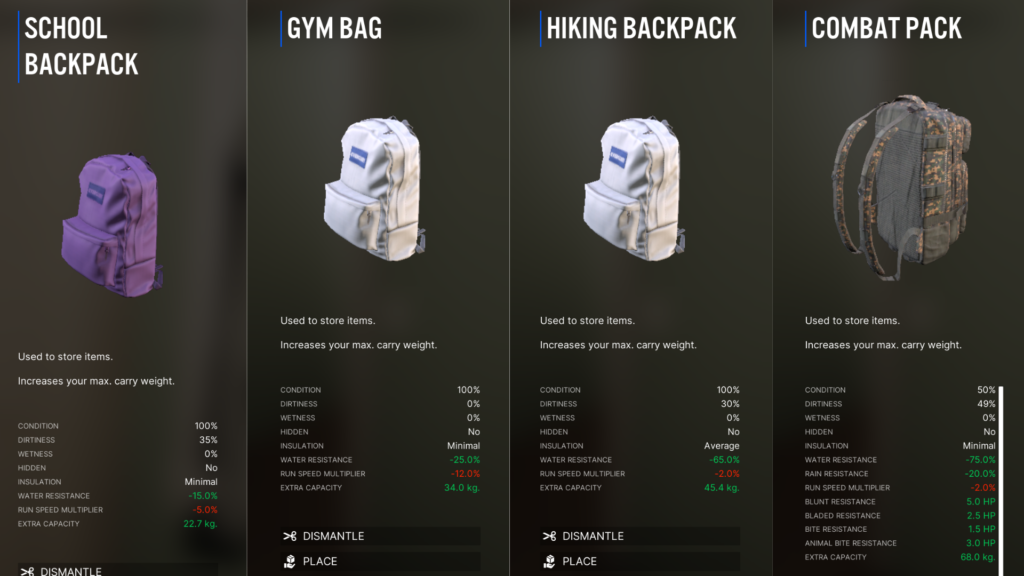
Backpack Availability & How to Obtain Them
- School Backpack and Gym Bag can be found naturally through regular exploration. You will come across them without specifically farming for them.
- Hiking Backpack is relatively rare. Outside of a few fixed spawn locations, it does not appear often during normal exploration.
- Combat Pack is easier to obtain than it may seem.
It can be looted from military-equipped enemies. If you spot an enemy carrying a large backpack, defeating them and taking it is the most reliable method.
2. Strength Skill Level
Each level of Strength increases your carry weight by 1 lb (~0.45 kg).
Strength is easy to level up compared to most other skills, making it one of the most efficient ways to increase carry capacity early on.
3. Strength Perks
A perk increases carry capacity by 50 lbs (~22.7 kg).
⚠️ Important:
If you take the carry-weight perk at Level 25, you cannot take Bank It later.
- Long-term players → Prioritize Bank It
- Short-term / casual → Take carry-weight perk
Recommended Tool & Equipment Loadout: What to Carry
When starting out in VEIN, the sheer number of items can make it difficult to decide what you should carry with you.
On the other hand, not knowing what to leave behind often results in a constantly full inventory.
Below is a practical guide to tools, items, and equipment worth carrying, to help you manage your load efficiently during exploration.
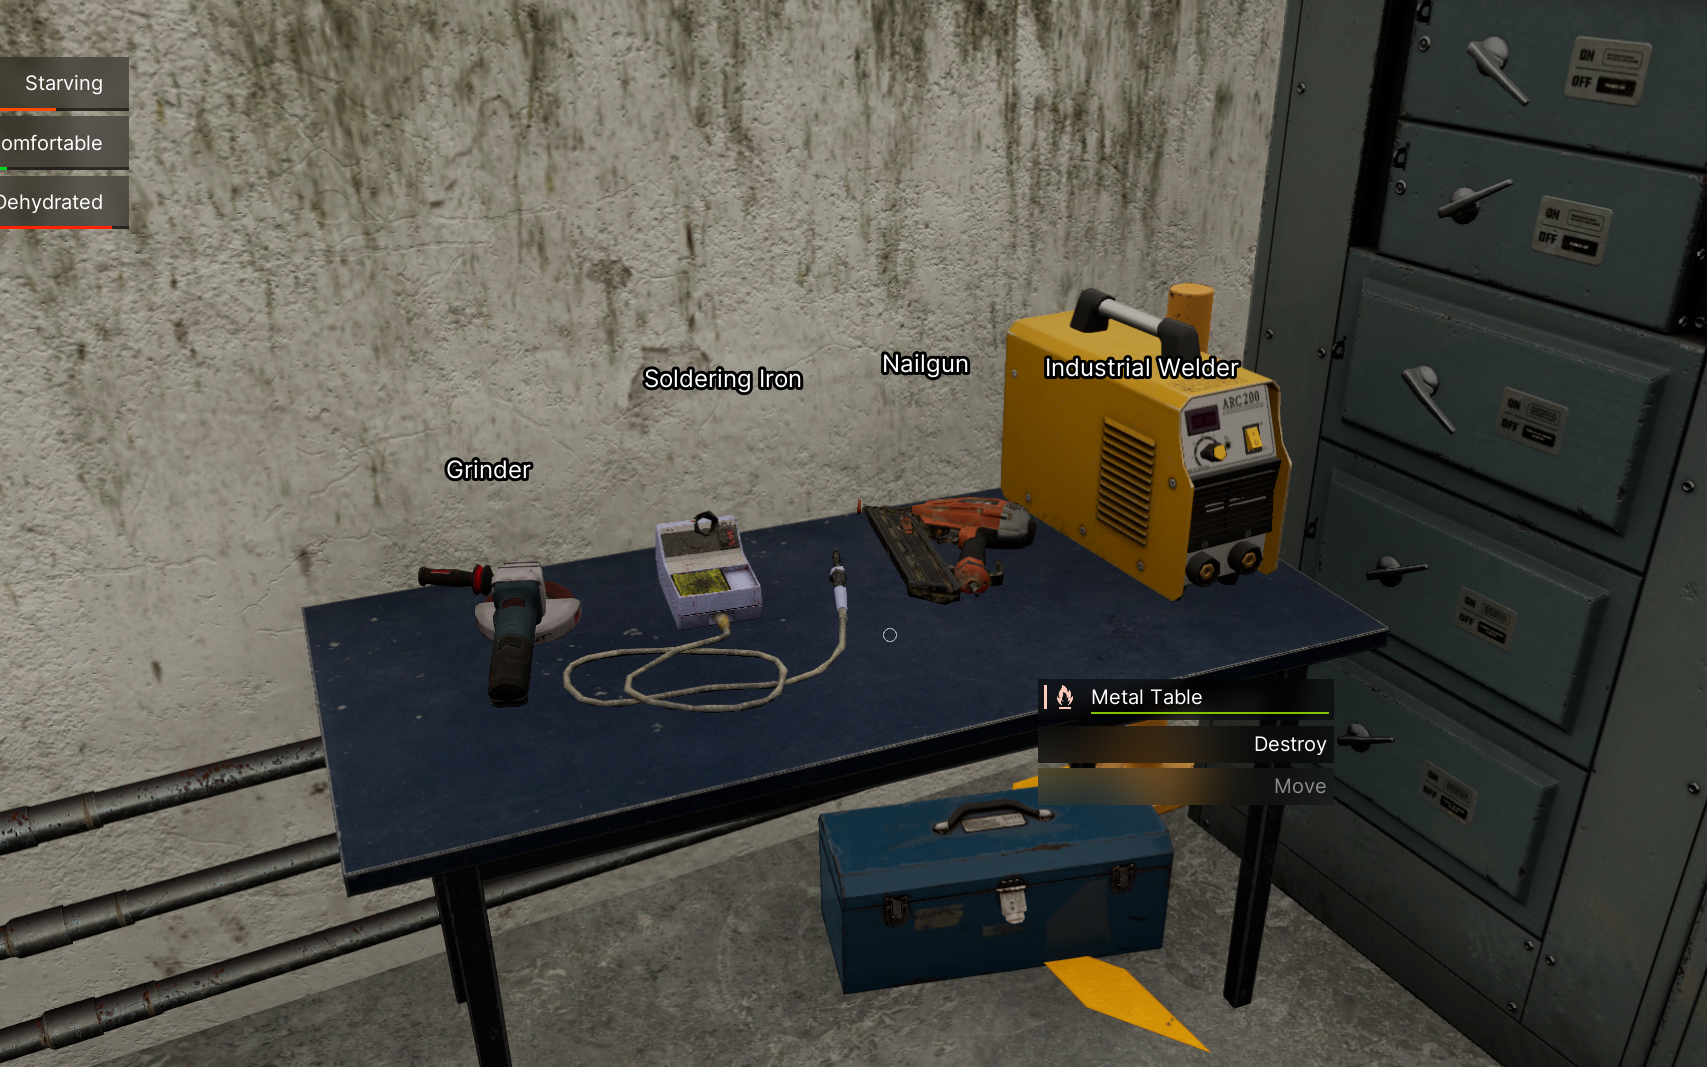
Tools
VEIN features a wide variety of tools used for crafting, dismantling, and gathering.
Each tool has one or more specific tool functions.
For example: The Adjustable Wrench provides both Heavy Pliers and Wrench functions.
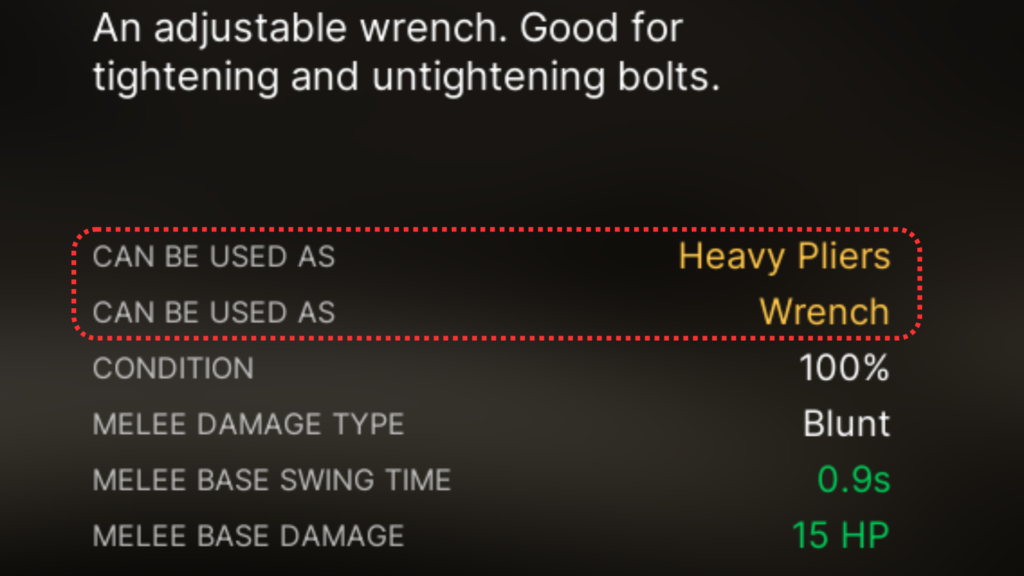
These functions are required when crafting or dismantling items, and the number of different functions is quite large.
Broadly speaking, tool functions can be grouped as follows:
- Crafting & Dismantling functions: 10 types
- Gathering functions: 3 types
- Cooking functions: 3 types
Tool Rank System
Each function also has a rank hierarchy.
For example, Cutting has an upgraded version called Heavy Cutting.
If you have a higher-rank tool, lower-rank tools are no longer needed.
The table below summarizes the tool rank structure and the final (highest-tier) tools.
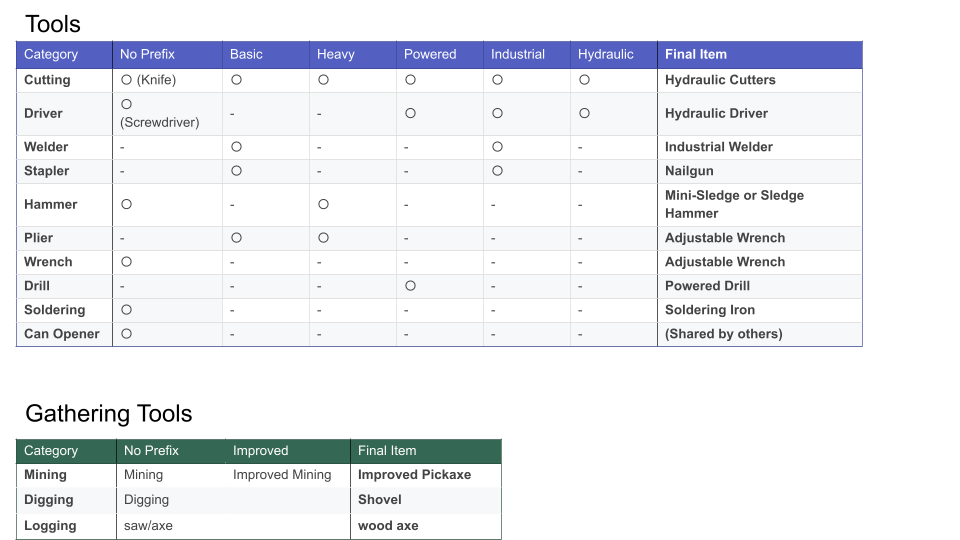
If you carry the 8 final-tier tools listed in the table, you will meet all tool requirements for crafting and dismantling in the game.
Other Useful Items
In addition to tools, there are many functional items worth carrying.
Not all of them are mandatory—adjust based on your playstyle.
- Cell Phone
A multifunctional survival tool. Highly recommended.
(Detailed explanation available separately.) - Lockpicks
Used to open locked containers and doors. Essential for exploration. - Water
Heavy when carried in bulk. 2–3 liters is usually sufficient. - Food
Cooked food is recommended. It does not spoil immediately, so food preservation is not a major concern during a single expedition. - Lighter
Used to light campfires. Can also function as a small light source. - Lantern
Can be held as a light source and provides a wide illumination area. Very useful in caves.
Optional if you have a headlamp. - Towel
Used to dry yourself when wet.
If your Wetness exceeds 80%, batteries and electronic devices in your inventory may be damaged. - Binoculars
Allows zooming in on distant areas. Situational and not used often.
Armor & Clothing
VEIN features both clothing and protective equipment.
Depending on the item, these can improve defense, resistances, movement speed, or insulation.
Below are a few recommended pieces.
Firefighter Gloves

Provides three defensive properties:
- Cut resistance
- Electrical insulation
- Heat resistance
None are strictly mandatory, but all are useful bonuses.
Gardening Gloves offer similar defensive properties and are also excellent, though slightly rarer. If found, they can be used as an alternative.
Firefighter Gloves can be obtained from fire stations or firefighter-type zombies.
Headlamp
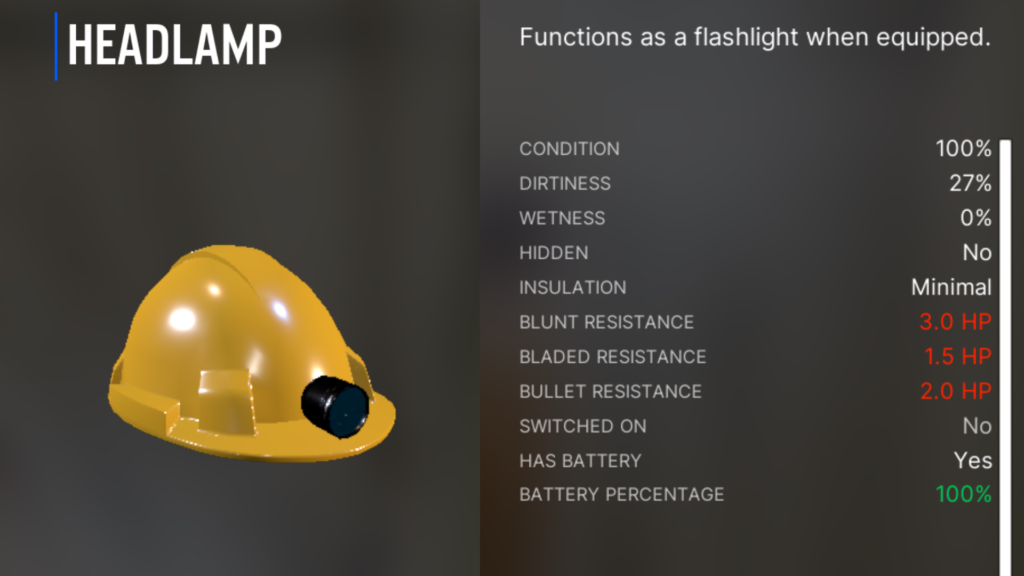
While its defensive stats are modest, it is one of the best light sources in the game.
Extremely useful for cave exploration.
Requires batteries, so be sure to monitor battery charge.
Commonly found in mines and wooden crates inside caves.
Combat Helmet
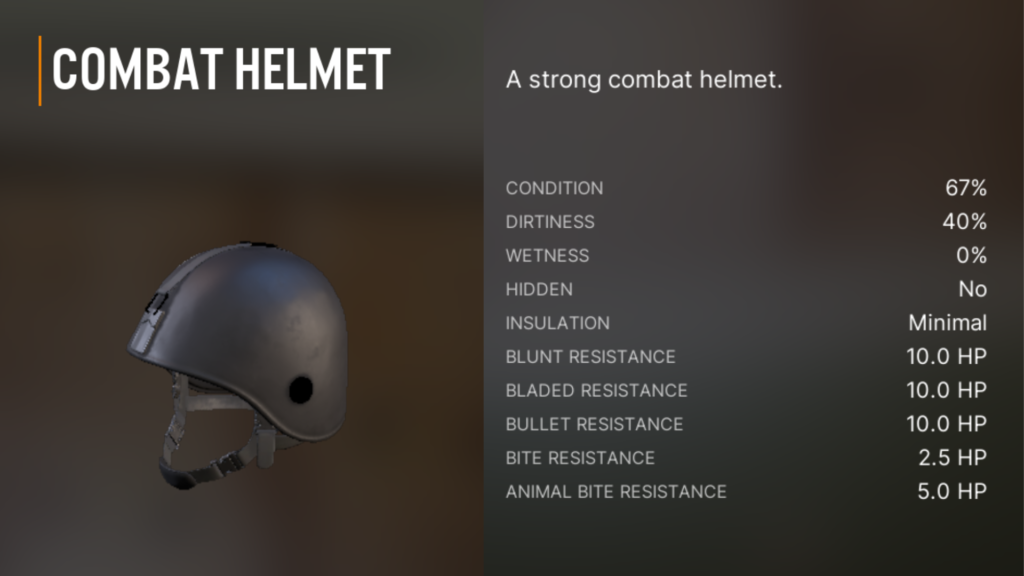
Offers high defensive performance with minimal drawbacks.
Shares the head equipment slot with the headlamp, so choose depending on the situation.
Police Shoes
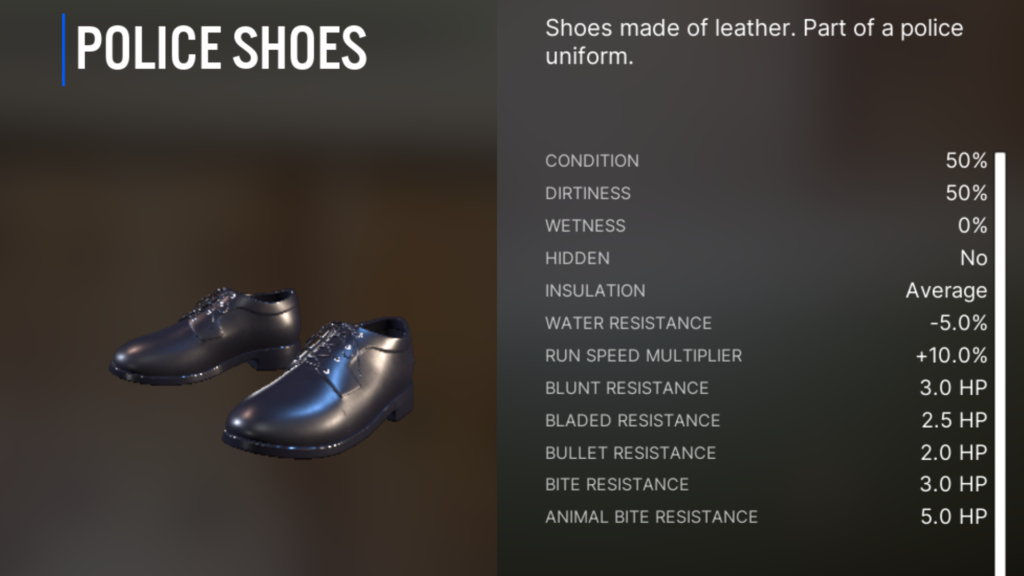
Significantly increases movement speed and offers minor defensive benefits.
Highly recommended for the footwear slot.
Correctional Officer Shoes provide similar performance and are also acceptable alternatives.
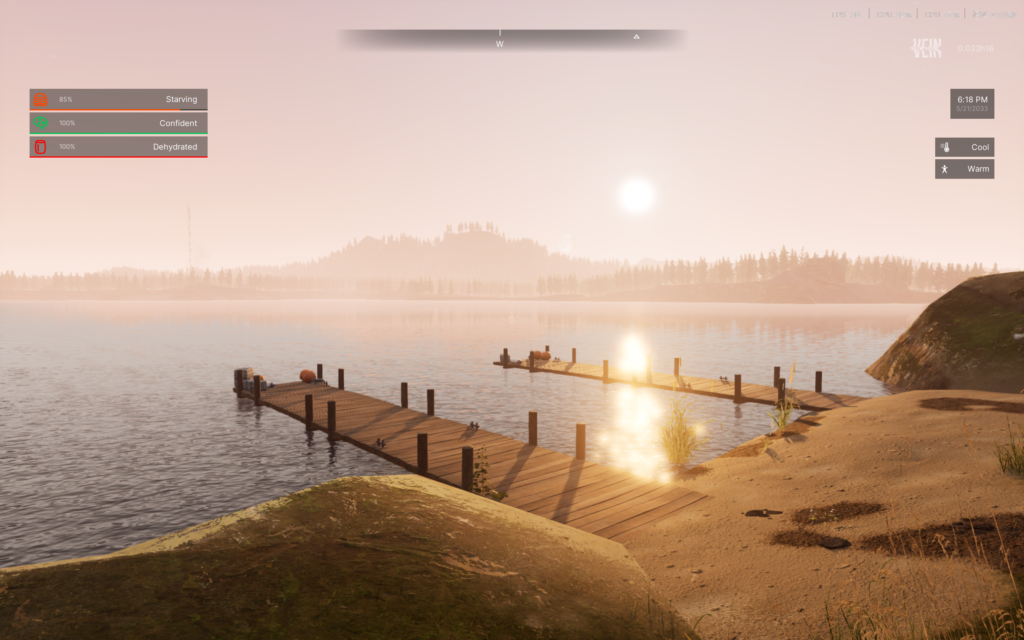
Water and Food: Building a Stable Supply
Water: No Need to Worry While the Tap Still Works
Many players assume that “survival means securing water first.”
However, on Standard difficulty or lower, there is no need to rush.
For roughly 1.5 in-game months, infrastructure remains operational.
During this period, you can freely drink water from sinks and bathroom faucets in residential buildings.
There is also no need to carry large amounts of heavy water bottles.
If you get thirsty, simply enter a nearby building and drink on the spot.
Food: From Scavenging to Self-Sufficiency
Food can be found by looting refrigerators and cabinets in houses, but snacks provide very little hunger recovery.
Your food situation should progress through the following three stages:
1. Scavenging
Eat whatever you find.
This is the most basic survival method and only a temporary solution.
2. Cooking (Highly Important)
Heat canned food using a stove or campfire.
Important:
In VEIN, simply heating canned food dramatically increases its effectiveness
(approximately 3× hunger recovery).
As long as you have a cooking station and a pot, these recipes are available from the very beginning.
3. Farming (Final Goal)
Establish your own food production by farming.
- Planters can be:
- Crafted by the player
- Used directly from towns
- Transported to your base (even by vehicle)
- Watering can be tedious at first
- Once sprinklers become available, manual watering is no longer required
If you want to reduce time spent searching for food, the best approach is to establish a base early and build a farming cycle.
How to Survive the Night Safely
At night, visibility drops significantly, making exploration dangerous and inefficient.
In most cases, it is safer to stay at your base and work indoors, or simply sleep through the night.
Skip the Night by Sleeping (Safest Option)
In VEIN, daylight hours vary slightly by season, but in general:
- Sunset: around 7:00 PM
- Sunrise: around 5:00 AM
The safest approach is to use a bed or sleeping bag to sleep and skip the night entirely.
Always Carry a Sleeping Bag (Portable Bed)
A Sleeping Bag can be easily obtained by looting tents, such as those found at campsites.
Once placed on the ground from your inventory, it functions as a portable bed, allowing you to sleep anywhere.
Keeping one in your vehicle or inventory ensures you can secure safety immediately if night falls while exploring.
Many tents in mountainous areas near Redford often contain sleeping bags.

Light Sources (When Night Travel Is Unavoidable)
If you must move or work at night, a reliable light source is essential.
However, light sources differ in illumination range and whether they occupy your hands.
Hands-Free vs Handheld Lights
- Flashlight-type lights that can be toggled with the F key do not occupy your hands
→ You can keep your weapon ready. - Lighters and lanterns require being held
→ You must switch back to a weapon if zombies approach.
Recommended Light Source: Headlamp
The Headlamp is the best overall option:
- Very high brightness
- Wide illumination angle
- Some variants are waterproof
- Ideal for caves and industrial facilities
They can be found in old wooden crates inside mines, quarries, and caves.
Important Note for Cave Exploration
For cave exploration, Cell Phones and Lighters provide insufficient light and are almost useless.
Always prepare a proper head-mounted or flashlight-type light source.
Light Strength Comparison (Weak → Strong)
Cell Phone < Flashlight < Headlamp
Lighter   < Lantern

Choosing Your First Base: Prioritize Space and Convenience Over Defense
With the current game balance, you don’t need to obsess over building an impenetrable fortress early on.
Instead, it’s far more important to prioritize expandability for when your supplies increase, and convenience to make daily routines smoother.
In the very early game, it’s fine to temporarily store loot in a nearby house.
Once you get comfortable with the controls and basic systems, you should move to a larger base as soon as possible.
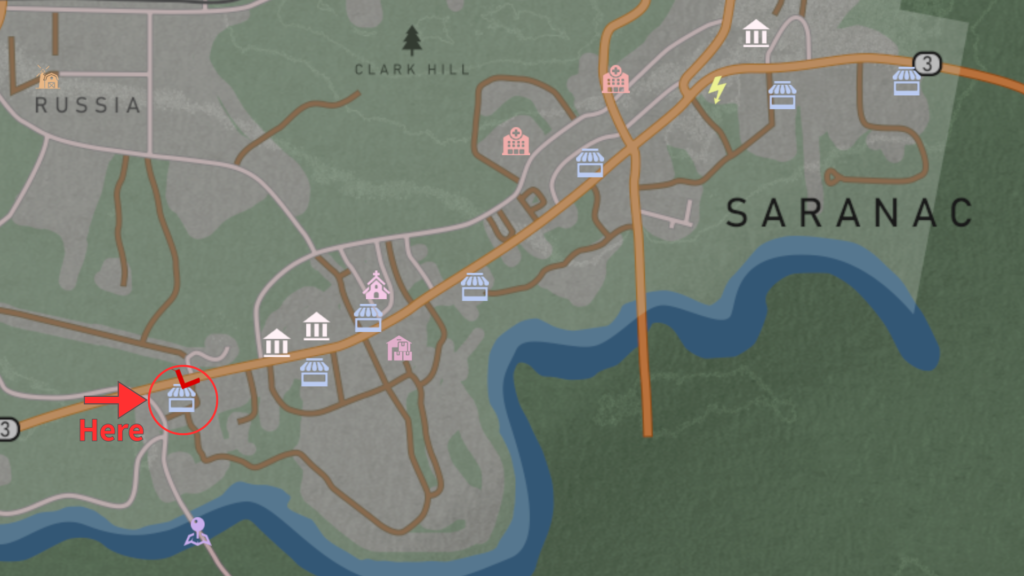
Recommended Base #1: Bridge Hills Bar & Grill
Refer to the image below for the exact location.
Parking Area
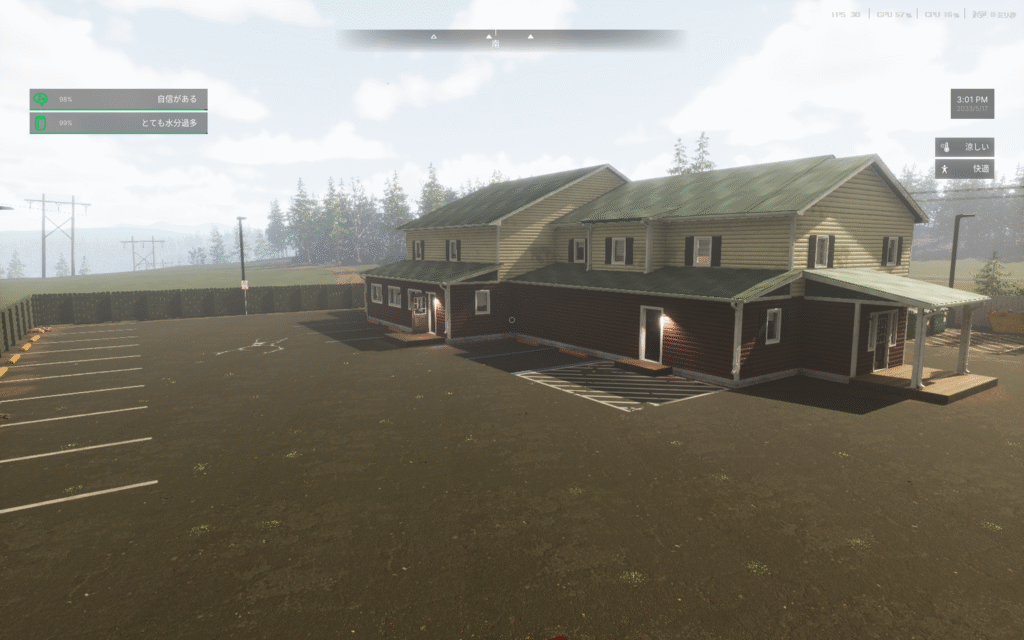
A large, flat parking lot with space for 10+ vehicles.
The flat terrain also makes construction and expansion much easier.
First Floor (Store Area)
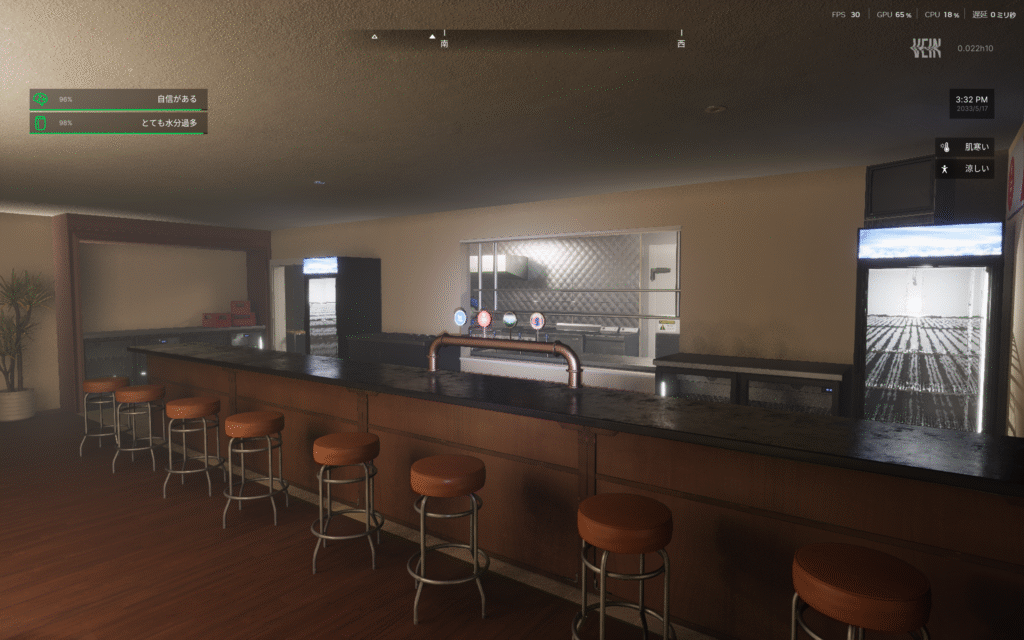
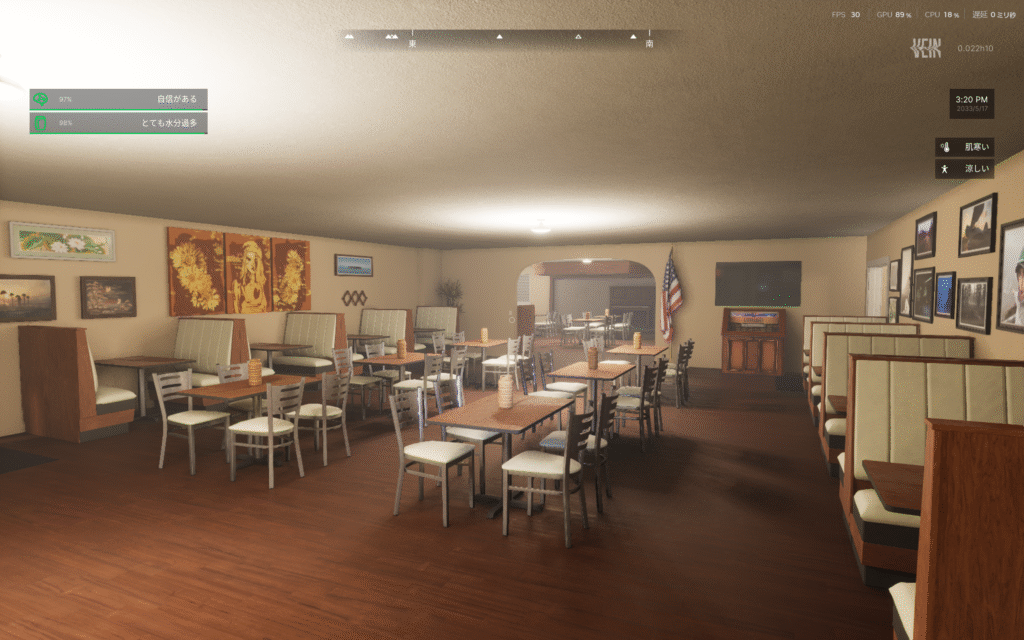
A spacious bar counter and a fully equipped kitchen.
- Multiple stoves and refrigerators are pre-installed
- Cooking and food storage are available immediately
- This is the biggest advantage of this location
Removing the seating creates a very large open space.
There is also a walk-in refrigerator behind the counter.
Second Floor (Living Area)
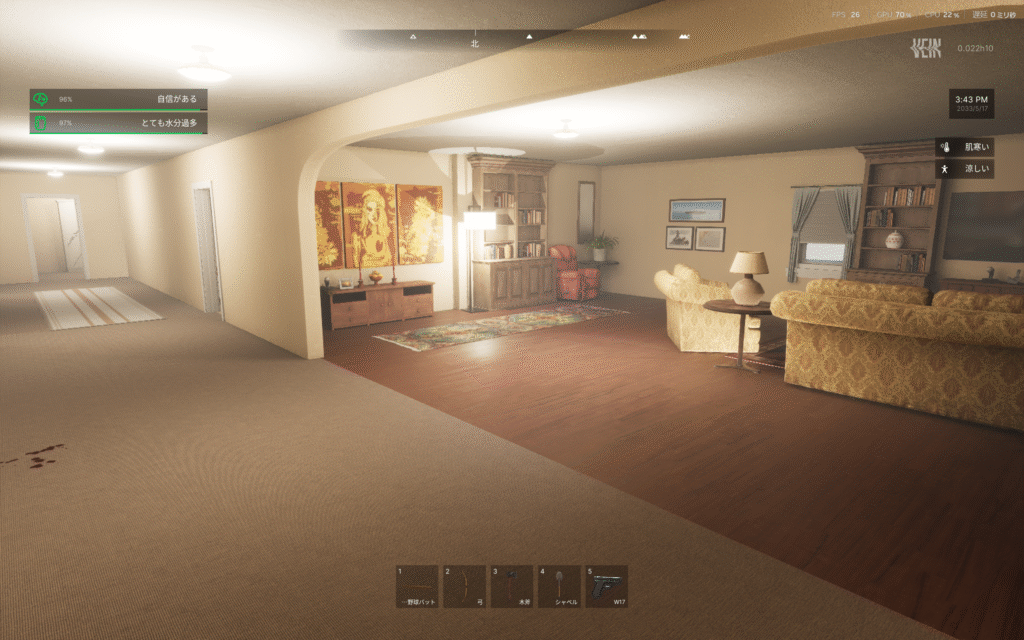
Decently sized with multiple rooms.
- Can be divided into bedrooms, storage, and workrooms
- Flexible layout for different purposes
The living room is spacious, and there is another kitchen on the opposite side.
Outdoor Facilities
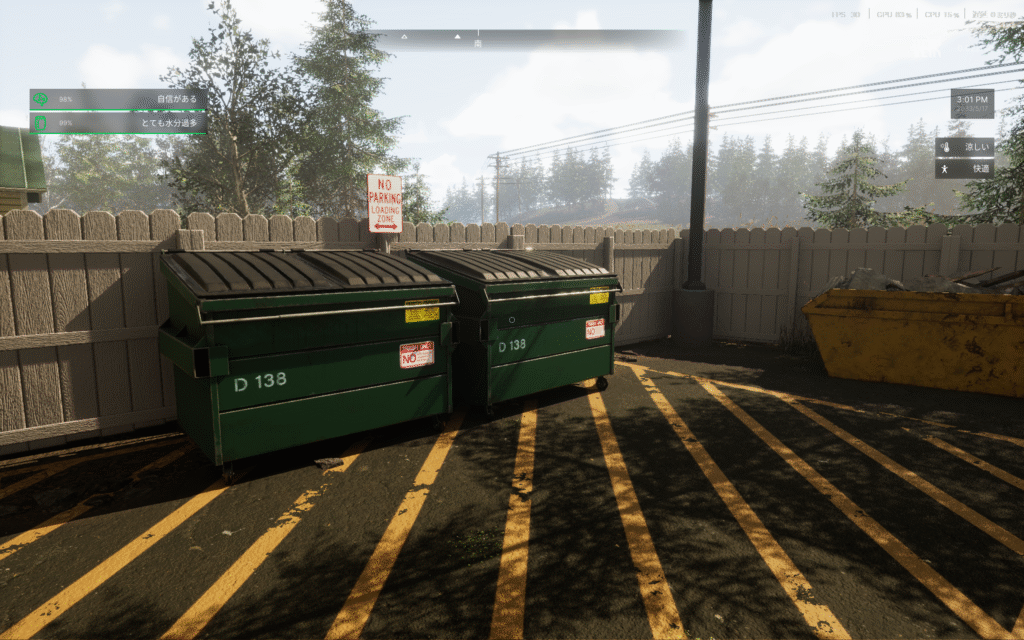
Two large dumpsters are installed outside.
These are extremely useful for disposing of unwanted items at your base.
Recommended Base #2: Valenrath Island
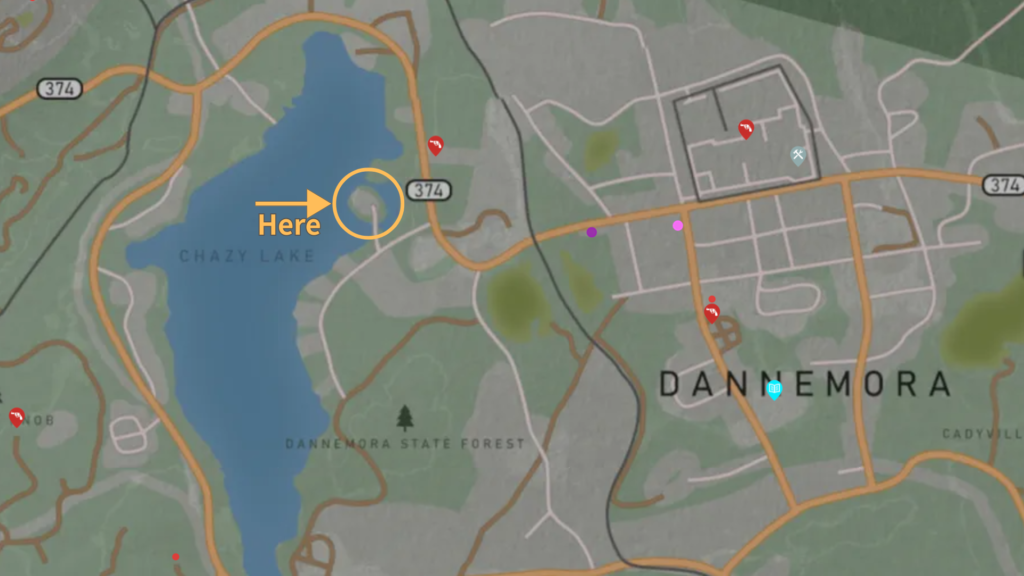
A small island floating on Chazy Lake.
- Excellent access to Dannemora
- Well-equipped facilities
- High expandability thanks to a small barn and an additional outbuilding
Exterior
A large, two-story building.
Interior
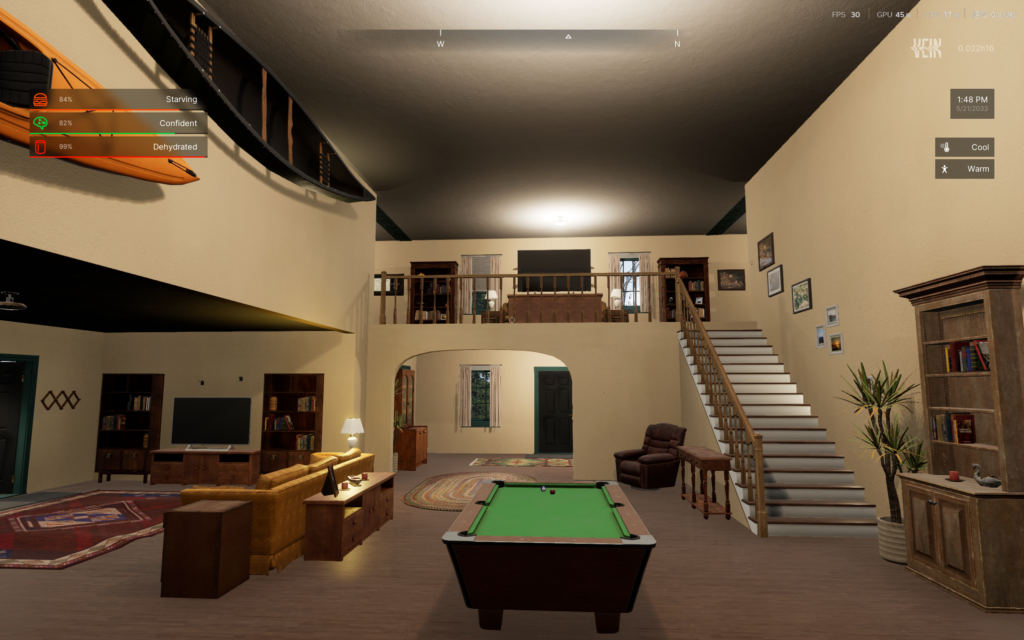

Well-designed and comfortable interior layout.
Farming Area
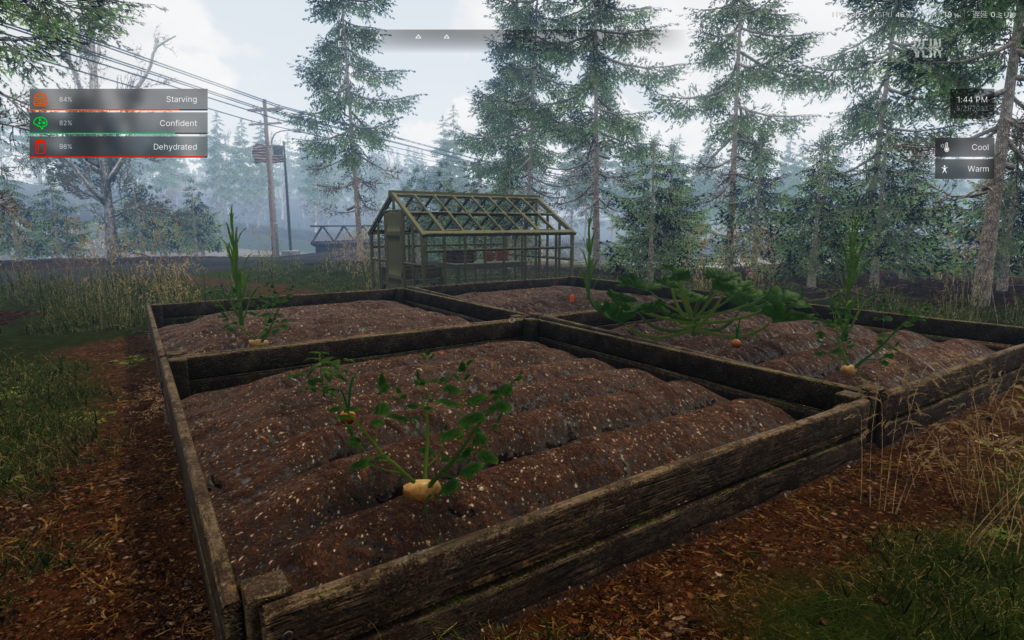
Well-developed garden space.
- Many small planters are already placed on the property
- Ideal for early farming setup
What to Do When You’re Injured or Sick: Press [I] First
In VEIN, various negative conditions can affect your character, including injuries, illness, and stress.
If you’re unsure how to deal with a condition, open the Medical tab by pressing [I]. It provides clear hints on how to treat your current status.
The Basics of Treatment: The Medical Tab
The Medical tab is useful for two main reasons:
- It only shows items in your inventory that are effective for the selected condition
- It allows special actions such as removing bandages or removing stitches
You don’t need to read item descriptions one by one. Using the items shown in this tab ensures you’re applying the correct treatment.
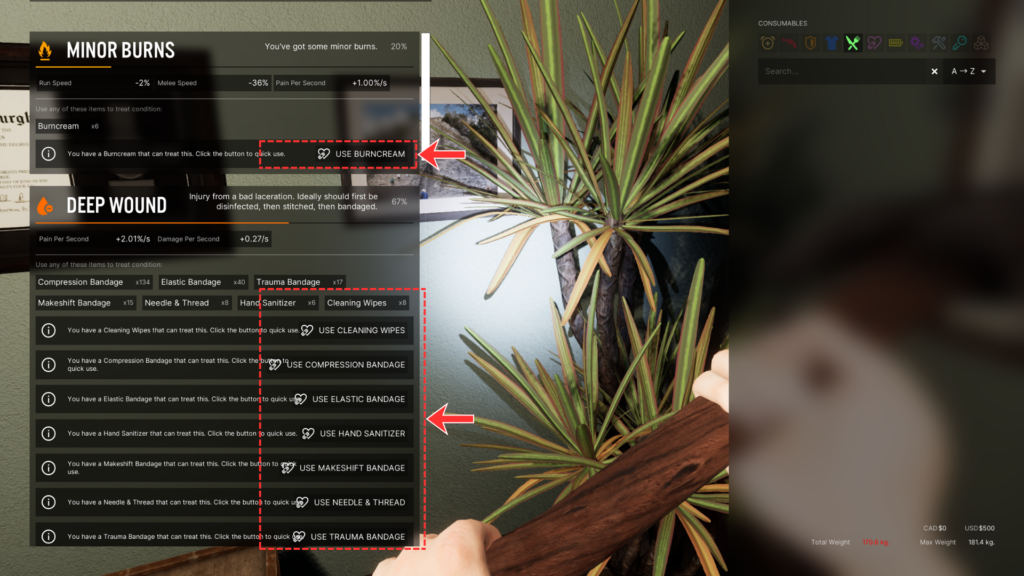
Early-stage conditions—such as the onset of a cold—that do not appear on the HUD can also be checked here. Opening the Medical tab regularly helps reduce risk.
Injury Treatment Has a Required Order
When dealing with bleeding injuries, do not apply a bandage first.
Once a bandage is applied, you can no longer disinfect or stitch the wound underneath, forcing you to remove the bandage and start over.
Follow the proper order:
- Disinfection & stitching
Either order is acceptable. Use hand sanitizer, cleaning wipes, or needle and thread. - Bandaging
Bandages are relatively easy to obtain and should always be carried. - Painkillers
Severe pain may require multiple doses.
Optional: Display All Status Conditions on the HUD
Normally, checking the Medical tab is sufficient.
However, you can change the settings to display all conditions, including normal values, directly on the screen.
How to enable:Settings → Gameplay → Enable “Show All Conditions”
This increases on-screen information and can feel cluttered, but it’s useful if you want to monitor your status without opening menus.
Death and Respawn Mechanics
There is no death penalty that reduces skill levels or XP.
However, some items will be dropped at the place of death, so caution is required.
If your respawn point is far away, recovering dropped items can be time-consuming.
For this reason, it’s recommended to set your respawn location somewhere safe and close to your usual activity area.
Updating Your Respawn Point
- Sleeping location becomes your respawn point
The location where you sleep—using a bed or a sleeping bag—will be set as your next respawn point. - Update only in safe areas
Updating your respawn point inside dangerous areas (such as caves) is risky.
If you are unlucky and drop your cellphone or light source upon death, you may respawn in total darkness with no way to see.
Always update your respawn point in a safe, well-lit location.
Item Drops and Recovery
- Random item drop
Upon death, a random selection of items from your inventory will be dropped at the death location. - Recovering your items
A marker indicating the death location appears on the HUD compass.
Return to that spot and interact with the dropped items to recover them. - Equipped items
Loading screen tips state that equipped items do not drop, but items equipped shortly before death may still be dropped.
This is official information, but its exact behavior is not fully verified.
⚠️ Warning: Possible permanent loss
Based on the author’s own testing, permanent item loss has not been observed.
However, community reports on Reddit suggest that items may be lost permanently with a certain probability upon death.
Do not assume recovery is guaranteed.
Keeping spare supplies at your main base is the safest approach.
Essential Survival Tips You Should Know
Finally, here are several important mechanics that are not clearly explained in-game, but can greatly affect survival.
You Can Transport Many Objects Using Vehicles
Facilities such as planters and generators have level requirements before you can craft them, so they are unavailable in the early game.
However, objects already placed in the world can be transported and used at your base.
For example, planters can be placed on top of a vehicle and carried that way.
⚠️ Be extremely careful while driving
Even slight contact with guardrails or other objects may destroy the carried equipment.
Drive slowly and cautiously during transport.
Large vehicles like trucks can carry many objects, which may seem suitable as a “mobile base.”
However, this is not recommended.
Carried equipment can break easily—not only from minor collisions, but also due to bugs—even when driving carefully.
The Terrifying 1% Rule
When attacked by zombies, there is a 1% chance of infection under default settings.
According to in-game descriptions, there is no cure, meaning infection guarantees eventual death.
This is why combat fundamentals are critical:
- Use weapons with high knockback
- Fight one enemy at a time
- Avoid taking any hits at all
Other Useful Survival Tips
Always Wear Shoes
Just like your cellphone, shoes should be locked in your inventory to prevent accidental removal.
Walking barefoot can cause foot injuries.
While this may seem minor, untreated wounds can lead to infections, which require antibiotics to cure.
In extreme cases, not wearing shoes can indirectly lead to death.
Dispose of Trash Properly
This is common in many survival games:
Dropping unwanted items on the ground can cause them to persist as data, potentially leading to lag and performance issues.
Items placed in dumpsters can be permanently removed by selecting “Empty Dumpster.”
Always dispose of trash properly instead of leaving it on the ground.
コメント